Search my blog

FEATURED POST

Air-Dry Clay Speaks The Word

Friday, 8 March 2019

How to make a Cover for Mini-displays

Hello Hartians!
As I promised, I'm gonna tell about the cover I made and the challenges I've met with this "simple" art.
Notice that in the pictures below, this was a miniature cake other than the one I made in my previous post.This time it's made up of air-dry clay. If ever you wanted to know more about that clay you can just check my blog in the link below if you're not into scrolling this page up and up! 😄


About the cover, all you need to prepare is a plastic cover, needle & thread, scissors and double adhesive tape/scotch tape.

Here's the step by step procedure:

1. Estimate the target height measurement of the cover.

2. About finding the measurement of the cover's width, the measurement is based on the board that holds the cake.
Estimate the front side, it should be of the same size as on the back side. (Because it's a rectangular shape we're doing). After getting the desired estimation, you can start cutting. You should give an allowance from the size you estimated so you can just cut out any excess later on. Just don't cut smaller than what you estimated.
You now have two rectangular cut-out covers that will serve as the front and back sides.
NOTE: Consider the height estimated when you begin to cut.

3. Estimate the left and right side and do the same steps as you did in the front and back sides.

4. Set aside the four cut-outs, then start measuring for the top side. In this part you need to base it solely on the size of the board. Cut it out.

5. You now have the five sides. Trim and secure the right measurements before proceeding into stitching them altogether. This task requires patience!

6. Stitch those sides that meets the corners. I prefer the slanted stitch application on this one. Just make sure to place the threads just a fourth of centimeter away from the very edge of the cut-out plastic covers. Start from top to bottom.

7. After every stitches, make a french knot tie to make sure the thread won't loose out.
NOTE: For stitches going downwards make sure you reserve at least a centimeter length. This space was allotted for sticking the cover underneath the board.

8. For a finishing touch you can clean up the covers since you might have blurred them with your sweating palms during the stitching. 😄 
9. To be neat, I suggest to stick the excess parts of the cover using a double adhesive tape. But scotch tape would do. Be careful on this part because the box-shaped cover must look tight when you're putting on the tapes.

Thanks for reading this far!

Thursday, 28 February 2019

Learn How to Make Miniature Cakes (2018)

I remember back when I was a kid, when I was with my mom buying a cake from Baker's Fair. there were cake replicas within the store. I'm naughty enough not to get caught by any of the staffs when I'm touching those cakes. In my hands I feel the texture like a real cake fondant. Pressing that toy cake the bread part was fluffy. I assumed this part was made out of foam.

Now I'll tell another backstory. I got curious about how a baking soda can clean those stained white shoes. I grabbed my old stock of the baking soda, fully aware that this is already expired, and applied it on to the stained sole part of my rubber shoes. I mixed it with water so the paste can stick with the soles. The end result? No whitening magic happened. But my attention was caught by the dried paste I applied, it reminds me of a hardened frosting, leading me to remember the first backstory I just mentioned.

It took me half  a day to finish, just the cakes.

Notice that! It's like a real cake. See and feel the bread

I put a toy decoration on the top in this one.


THE CREATIVE PROCESS

Memories are still fresh when I combined the following materials: square-cut foams, poster color paintings, baking soda, glue, right amount of water and mini-decors. First, I glued together those layers of foams (serving as a bread). Then I prepared the icing part by making a careful measurement of water in proportion to the baking soda. Remember they should be in a right amount so the icing would be firm enough to stay with the foam. I separated portions of soda paste to their respective colors. I mixed my paint red to some, blue to some, yellow to some and so on.

After assigning colors I now spread the colored paste through different areas of the foam. For the first layer I applied a thin amount of paste, if applicable, do the same for the second layer until you're satisfied then the last layer would be the thick icing part. For a final touch I also put some toy decor on top.
Be careful once the paste is dried, especially for the thick paste, they are very fragile so don't put so much force if you're going to touch it.

Current status of my artworks: They already belong to somebody else. I continually asked myself, what was I thinking?? Why did I gave them as a gift? It's hard to make a miniature cake you know!
You know what, on my upcoming post I'm going to share about how the cover of that cake was created.
Hope you're inspired reading and looking at my crazy creations!
-Hartiart 

Monday, 25 February 2019

STAGES OF HAVING A CRUSH (UNREQUITED, LADIES POV)

Hi Hartians! Would you allow me to take advantage of the love-month once more? 😄 I'll promise you'll still see something art-related like that posted painting! 😊
For so many times in my crushlife I've figured out the most common occurrence when a girl like me is having a thing on somebody. The list I'll mention below may not apply to everyone, but probably more or less, you encountered them all!

Untitled (2017)

1. WHOOPS! AWKWARD- Imagine when you sneeze a lot of times and feel something rough in your throat then you began concluding: "I'm going to catch a cold!" In the case of the first crushing symptom, it's the same as the sneezing signs! You really don't want to have a cold but the signs wants to trigger them! You don't even think that these signs are "crush-things". Have you noticed the handsome features of that guy, the way he smiles, how he moves, Isn't he awesome? But omhaygash when he comes near me why am I feeling a bit sweaty?

2. DENY AS MUCH AS YOU CAN- There is an inner denial upon having noticing that guy's assets simply because you don't want to see yourself having a crush on him. There's inner dramas like: "Don't you dare to fall for him! I don't want another heartace!" or, "Why bother crushing him I don't even stand a chance!" or "He's not really handsome he's just fair-skinned!"

3. ADMIT IT- "Maybe it's true that I have a crush on him. But just a little crush." From the awkward stage up to this stage, all of those crushing dillemas are only found within yourself. It means that only YOU has the full knowledge that you have a crush on him, not even your closest friend knows about this. In this part you feel very secured about your secret. Your mind tells that whatever happens you're not going to tell this to anyone because you're super-duper afraid that someone might know or that HE might know about it. Just act normal.

4. FRESH CRUSH- Right after the acceptance, you just welcomed the fact that having a crush on him would be totally different than when you don't have that thing. The silly manifestations starts to happen such as:
- Wherever you look you always see his' face.
- You can't get him out of your mind no matter how you kept yourself busy.
And having experienced these signs, a few more moments you'll find them kinda distracting. You'll somehow be out of your mind but this won't last long.

5. HIGH PEAK- Suddenly, that day came where everything seems to be in favor between you and your crush, and because of the heightened emotions of happiness, the fear of somebody knowing your secret begins to subside. You find it somehow impossible to keep it to yourself that's why you started telling about this to your nearest friend or relative, yet still you don't want that guy to have any clue about your feelings. You also begin to become curious about him, and can't tame yourself without searching for his' social media accounts.

6. EXPECTING FOR MORE- It's like a climax in a story. You're quite having a good time with your crush yesterday. "Ohh what's next? Will he talk to me more often?" Whatever you just experienced during the high peak, you're so excited for this good feeling to continue and you expect it would go to the next level. You smile at the random moment and your friends came teasing you cause' you look like crazy.

7. FALLING ACTION- just as when you started expecting for more due to all the "kilig" moments you had with him, this unexpected stage suddenly comes into scene. High peaks begin to fall down. You just visualized what spark the two of you would gonna be in the next days yet today, you just didn't saw him. "Oh why on earth I cannot see him around?".

8. SADNESS- High peaks are totally gone, not only because you miss him, but also because you kept on craving for sparks or what you call "kilig factor" which slowly fades away now. This is the start of hated stage of crushing someone.You want to maintain and sustain the spark but you just can't do something about it knowing that he might never felt the same way all this time. Happy fantasies over. Reality hurts. Now you smile like an idiot because of those happy memories but at the same time, undeniably sad!

9. BORED- You became tired cause' it seems like all the happy side of crushing on him was now replaced by all these sadness and even more. Also, not to mention that you began to find out he's into somebody instead of you. You wished you never had a crush on him from the first place.

10. THE LAST- The spark is about to die and there's now a higher chance to have a crush on somebody else, either to like another and suffer the same process again or just to let life flows the love it offers.
But we all deserve a love, not this sort of temporary silliness.

Go to Hartiart Facebook Page

"Wildlife" (2019)

My photo reference was taken from my visit in Wildlife last year. This was my third painting for the year. (The second one, wait for it on valentine's day hihi but it's just very simple).

I started by sketching the curved road so if you notice some traces of pencil, never mind it's not that obvious. 😄 I need to determine the distance of the trees or how wide would the sides go on my painting so I painted the road first. I did a wet on wet approach in this part. I just added some gray layers when it dried.
The second priority was the tree branches. they will be the guide to where I would put the leafy and the soily parts of the painting. I am fully aware that it's wise to put on light colors first but I find it hard in this case 'cause they used to follow where the trees are.
Having a few colors in a painting is not so challenging if you put together the similar shades beside each other in your mixing palette. In this way, you'll be able to mix them easily to create a lighter or darker tone.
Hope you learned from this simple technique of mine! 😊
Also a lesson learned: Next time I'll be using a neater washi tape, for the painting is already in a full messy blast.

Wednesday, 20 February 2019

POEM #1 (Only Legends Would Know The Meaning)

"LIKE YOU NEVER CAME"
By: Hartiart

I won't admit that I was lonely walking alone in this sick dark road,
Without knowing if there's someone else to take away the isolation,
If there's anyone to bump with on the way to pause the tiresome walking,
Till' I see the other version of myself, the one whom I called "you".

I gaze with wonder, so curious how could someone like you ever invade,
The peace my heart breathes, turned into the fastest beat like music,
Now I don't mind walking without light, as long as I have you,
The journey was still a far way to travel, and I savour every moment.

Slowly as it goes, you're making me smile and made me forget my lonesome walk,
Then I noticed your smile, your beauty, all the things I like about you,
As I watch everything unfold, every steps we take brings us closer,
But I remember with sadness, somewhere in this walk we'll meet the horizon.

Yet before we even set our feet for the last trace we'll make on the left out road,
A strong wind suddenly took me away, my feet can't step where you are,
Now I was on that part of the road twice the gloom than before,
Twice the sorrow like you never came at all.

I would rather take the long journey with you,
Than knowing along the way I'll spend a short walk without you.

"Ecopark" (2018)


"Hiding What I'm Feeling" (2014)

Hi! Now I'm pausing for a while about the process and will now tell the meaning and the story behind this painting.

Add caption"Hiding What I'm Feeling" (2014)

Like my usual dillema about not-an-artist days, this painting belonged to those days. I don't know the proper techniques but all I know that time is I have something in my heart that I wanted to paint. 
The main focus was the girl (that's me) looking at the leg in the corner that was about to step out. This leg represents the boy she's admiring. The artist wants to keep the boy a mystery so she didn't even reveal small details like the color of his' skin.
The setting was a forest. The leaves are the main help to represent something hidden, so they help the girl to hide herself. That's the end of the story.
It's kinda sounding corny I know, but what I want to share especially for the new artists, that it's all right to start their artist journey not minding about the do's and dont's of the colors, but to know what picture would you want to appear in your own art.
If there were two of myself namely: Angel me and Devil me, the angel one would say: "You are given freedom to make art. Don't be afraid using brushes, papers and mixing colors. You'll eventually learn from your own experience, and to get serious, those technical details about painting will just follow, with an enjoyment in pursuit of these knowledge"
While the devil one would say: "The painting is totally ruined! Don't you see the hideous overlapping of uncomplementary colors? How can you be called an artist if your art doesn't even stand out? How come you use such mediums and self-made techniques such as using a stick for thin stokes? So silly to think of painting another layer while the previous one isn't dry yet. Colors are flat how can you add details?" 
Then all you feel was stress rather than a hobby to enjoy.

Though most artists normally experience both things, but above all else, it is only YOU who knows what you really want to do. My last reminder was, do not limit yourself. Years later you would turn out much better. Have a happy painting!
-Hartiart

Air-Dry Clay Speaks The Word

Tonight, I'll be sharing about these two cute stone's story.

Front View

This was made out of air-dry clay. I've mentioned about this in my second most recent post so I won't tell the creative process again. 
As soon as the clay hardened, I applied watercolor medium. The first one was combined with warm colors while the other one cool colors.
 Letting it dry, I wrote a bible verse on it using MICRON black fine pen. After this I coated the stone with the max bond glue. If I used an ordinary sign pen, it could've washed off the ink. Thanks to that 0.2 point pen! (Never mind my penmanship hehe)

Back View

Here's the story...

Why bible verse? I could just have written any other thing. But you know what, I've had a good idea about sharing the word of God in my most introvert way. I'm glad I'll be using my talent for God's purpose. So yeah, I'm a Christian. But it wasn't that easy.
Christians in the world outside the church are often perceived as self-righteous people, filled with hypocrisy, pointing fingers to people's sins, religious and whatever they think weird. So if being a Christian is just a heavy mask to wear, then they wouldn't want to be one. 

But it's not this way. It's more than what we all perceive. I experienced it myself. This is no mask to wear. This is no pretending to be an angel. This isn't forcing ourselves to be perfect.

It's not the "Christian" label that makes me good. But from something I could gain inner joy, strength and peace, there's just no word that can describe what it is like to know that God is more than what we all see, feel and perceive about Him. He is alive and so personal and so near!
You feel relaxed travelling to places of nature. You feel entertained with the gatherings you had with your friends. You feel happy getting all that you want, but nothing compares to the joy that comes from God. 
It's everything. It's looking beyond reality. It's about knowing that whatever part of the journey you might be in, Someone is there to guide you towards His' plan. I swear this was THE VERY THING EVERYBODY WOULD WANT TO EXPERIENCE.
Enjoying the imperfect like with the perfect God,

-Hartiart.

Goodnight! :)

Hi. This is my nighttime story.
Childhood won't be complete without a doll lying beside you before you sleep. You talk to it as if this was your imaginary friend. Things you discuss on the days back aren't as harsh as today right? But who says fun is for kids only? 😄

Back in highschool, on a TLE subject we were taught how to sew. We learned different techniques how to make a stitch, on what kind of fabric and thread appropriate to make an art on that piece of cloth. Without the teacher's instruction, sometime in my house I decided to apply what I learned and tadaaah! I made my new buddy. 
Her name is Lily. All you see in her face was full of energy, positive vibes, filled with hope and did you know that she can dance too not to mention her different-sized feet? 😆 It's feels so happy to see this kind of face, she can share her smiles to cheer up people.
So many circumstances happened, but thank God she's still alive today. I mean, she could've been destroyed (cause her beaded dress was already on that state) but a handmade treasure will always be the best, even when stitches break their line she's still the best doll in the world! 😊
Goodnight and have a good sleep! 😊


Go to Hartiart Facebook Page

MY STYLE OF PAINTING: PEACE-GIVING NATURE

My first painting of the year! yeeey!
MY FIRST 2019 PAINTING "SILHOUETTE"

Flash forward, just a break from the creative process of my paintings years ago this time I'll be discussing about my style. 😊
I'm aware that not everyone would appreciate my style. I'm more of a loose and scattered rather than perfect shaped picture perfect, and as you notice, almost all of my paintings involves nature. I am not following the current trend which uses painting as a voice to create awareness, or some sort of depicting a disturbing or touching message. It depends upon the artist how he/she express him/herself. 
Even if a painting seems to be peaceful or hard to understand, it doesn't mean a painting is less than pretty in comparison to an artwork which evokes deep emotions. Everybody has a story to tell and my story was...

Peaceful. More or less, people can't deny that nature is always associated with the word "Peace". Aside from my love in nature and my skills especially inclined towards landscape painting, I love being at peace all the time! (Of course this isn't perfectly possible in the real world). 

Seeing the reality I'm in, the left and right unavoidable toxic environment, the loudest battles I fight in silence within me, peace was my main necessity. Peace is something that would take you a little break in the fast paced environment. 
It's kinda draining to be always on-the-go because as a human, we need to take a break for a while and give ourselves time to relax, to meditate, to ponder on the passing time. Being at peace you'll learn how to treasure time. 
To value your surroundings at its simplest. To feel the gentle breeze passing through the clouds, then to the leaves, then to your skin. The waving trees rich with leafy green freshness catches the glistening ray of sun in between them. To smell nature is heartwarming, how much more if you would see it?

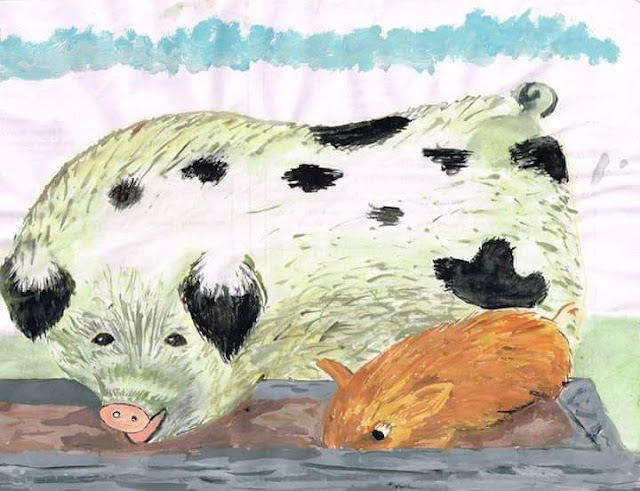
COPYCAT PAINTING! XD

MY 2013 ARTWORK


Painting Reference: The Animals of Farmer Jones (Children's Book)

During my not-an-artist days I've done something I'm proud of! 😊
I'm not really an artist. I was just a copycat that time. 😄
I painted this next to my first attempt of painting Mount Taal. Same as before, I used a reference. I got it from an illustration in a children's story book named "The Animals of Farmer Jones" if I weren't mistaken about the title. 
I used the blank portion of a printed paper. My thick poster color mixing technique did the trick. (Cause I'm not using a watercolor paper at that time and I'm not into heavy watered paintings, otherwise I'll be ruining the paper).
 It took hours to finish the work. I'm more of immitating of what the color in the illustration shows. So my greatest challenge is about mixing colors. So far I succeeded making a duplicate of the painted illustration except I painted the white pig a bit slimmer 😄

AIR-DRY CLAY BASICS


Now I'll be sharing my experience in using Air-dry clay. Most of you haven't heard about it yet and today I'll be discussing what it is like and the challenges I've met in this kind of clay.
Most of the people already seen my post about these cute miniatures. They're colored and glossy yet they all started in a blank, white, smooth clay. By the name itself air-dry, the clay hardens through prolonged exposure in the air. The smooth clay dries so it becomes a hard clay. This is different from the polymer clay which hardens by heating in the oven. That's one point for this air-dry! No need for ovens. 😊
If you're familiar with the hardened plaster solution, it's almost the same with this clay. You can use it to make writings like a chalk does.
But since it's a chalky thingy, there's a challenging part here which makes it less neat compared to the polymer clay. What I'm trying to say is, no matter how good you are in carving and shaping the smooth clay, there will only be a limited creations allowed. It's not advisable to make a super-thin shapes out of it, for this would be easy to break if you're not careful.

My finished product 


It's as flexible as the modelling clay when it's still smooth, but the moment it dries up, there's no such thing as perfectly smooth texture 😂 If you're aiming for a neat, super perfect shapes, well sorry, maybe this is not the clay for you.
Another challenge I've met is when you stick the smooth clay together, they are easily combined, but as the clay dries, they separate. So you need to have a strong glue.
I recommend using Max Bond Glue, All in one glue. The price is so affordable! At first it looks like an ordinary school glue but after it dries, you'll notice it's a powerful glue. It can bond the clays together. This is also my secret for achieving a glossy look for my miniatures.
So here's the process: I mold the shape out of the air-dry clay, then let it dry. This will take almost a day. When it dried up I use my watercolor to give the colored look and last, I use the Max Bond Glue to coat the entire clay.
After the finished product and still there's a leftover smooth clays left unused, don't worry it won't become a hard, useless clay. You just need to fold the hard-foil packaging and that's it! You can still enjoy that smooth clay for some other days.

Thank you for reading this far! 

"REFLECTIONS" (2013)

Now, I'm going to share to you the story behind the piece made during my "not-an-artist" days so it falls under the category of my Humble Beginnings.


Giving a throwback from the past...

Months after the day I painted the Mount Taal on a piece of notebook paper, I'm glad I improved 1%!! 😄 And what is that percent all about? It's about using a better paper to catch my painted art! This time I used a blank paper (but on the other side was the photocopied part). I'm still not wasting any paper!

I scanned through my things and found a paint (the leftover paints given to me when we're making props for school). The paint I had on that plastic container was kinda different from the usual poster color I'm used to. I don't know if it's acrylic or textile cause the dry parts of the paint are like plastic, cannot be used again if I mixed with water, unlike watercolor. But since these scraps are not using for important reasons anymore, I decided to make a painting using these. 
Aside from having no use, there are parts where colors red and blue, repectively green and yellow have mixed themselves. Instead of throwing them away I thought I could give them a chance to become part of my artpiece 😁

Thanks to my resourceful self! I cannot deny the fact that I'm having hard time achieving my expected picture. Given that I'm so ignorant about the techniques, what I'm doing that time was just keep on painting and putting layers of colors without minding about the rule of waiting for some layers to dry before applying another one. 
I forced myself to use that I-have-no-idea paint, those green and yellow to apply in that paper, using water though they aren't watercolors. I applied them on the leafy part of the painting, surprisingly the paint turned to be contributing itself to make those leafs appear more natural. The rest were all painted using my poster color.
The title of my painting, again, is "Reflections". But as you can see, I failed to give those leaves a reflection on the waters below. Did I shocked you for saying that under those leafy things was some soil with the pond? 😯

So that was a silly idea and I have a hard time but in the end...it was still an art! 😁
I realized no matter how knowledgeable or ignorant you might be about arts, if your heart's desire is to make an art, it will always find its way into arts.

It's a fulfilling thing to make an art and then realize later on that you have improved even the slightest percent possible.


THE CREATIVE PROCESS: SEE AT THE SEA


Now I’m sharing my experience when I'm still beginning my watercolor journey.
This is technically not my first time doing a painting (because no one cares to remember how I paint on my kinder days) but I consider it my SECOND TIME painting in my teenage years.

See at the Sea (2013)

Back in 2013 I saved some pictures of the Philippine mountains which came from a chart common for elementary student's project. I chose Mount Taal if I'm not mistaken, and tried to paint from a scratch using the picture as my reference. I used a student-grade poster color by the way, and the results...I was somehow amazed. Didn't expect the outcome to be a little pretty and from now on, I tried working on a blank paper.

Those moments I have almost zero understanding about watercolor. All I knew was to dip my brush into the painting and to the water and brush them off on a piece of paper. I was so naive about the rules, techniques, and the best mediums I should apply because being a watercolor artist, that time isn't a part of my vocabulary. I'm just having fun about colors!

I have this softcopy when I scanned the artpiece to our nearest comshop.

Today, this painting has gone missing. I can't remember how I lost it, it's possible that i just misplaced it somewhere or I've given the piece to one of my friends, or, I don't know. T-T
Anyway, thanks for passing by my story!

-Hartiart

#HumbleBeginnings

https://www.facebook.com/hartiart2018/